
Adobe Photoshop includes a ton of tools and it are often quite confusing for a beginner. That’s wherever the new ‘Learn Photoshop’ series comes in. I’m about to show you ways to use a number of the fundamental tools and can eventually teach you ways to edit your photos and build higher web log pictures. I’m aiming to write one tutorial for beginners each month, and you’ll be able to notice them within the Photoshop a hundred and one class.
If you don’t have Photoshop you’ll be able to transfer it as a free thirty day trial from Adobe’s web site. For those desperate to decease, there’s a good Photography arrange at solely $10/month (it conjointly includes Light room) or if you’re a student you’ll be able to get the whole inventive Cloud set at a special worth. you’ll be able to conjointly notice older versions of Photoshop at sensible costs.
Lesson 1: Getting started with Adobe Photoshop
Today’s lesson can show you the way to form a replacement document and that we also will take a glance round the work area.Creating a replacement document
When you launch Photoshop, you’ll notice that there area unit lots of tools, however there isn’t any document. you’ll produce one by planning to File/New or by pressing Ctrl+N. A box can appear with lots of choices.
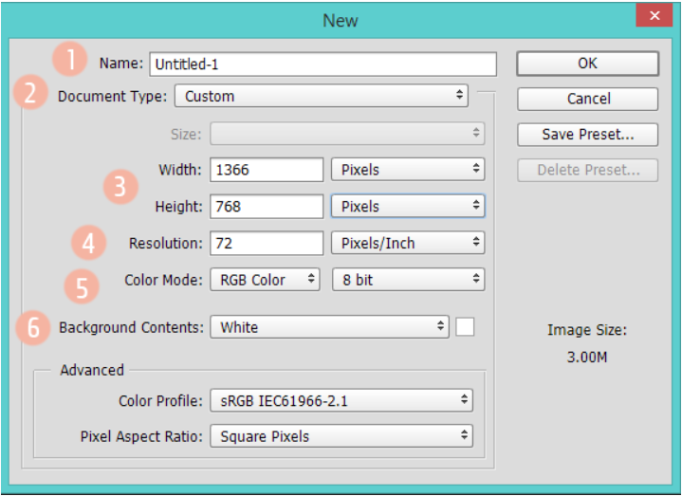
Name: you’ll name your new document or add a reputation after you reserve it
Document sort and image size: Photoshop features a few predefined documents like paper (letter, tabloid, and international formats like A4), photo, web, and art boards. you’ll conjointly opt for a custom size.
dimension and Height: For custom sizes, you’ve got to introduce the peak and dimension of the document and you’ll add it in pixels, inches, centimeters, millimeters, points, and picas.
- Resolution: refers to the amount of pixels per in. that may be written on paper and therefore the size of these pixels. If you wish to create internet pictures you ought to opt for seventy two pixels/inch, however if your pictures area unit for print, you ought to opt for a minimum of one hundred fifty pixels/inch, although it might be higher to line it at three hundred pixels/inch.
- Color Mode: color modes determine how an image will be represented in print or on screen. If you want to edit photos or make images for the web, you should use RGB color mode, but if you want to make images for print, you should work in CMYK color mode. Let’s take a look at the 5 color modes:Bitmap: it’s a black and white image that’s formed only from black and white dots, with no color levels in between
- Greyscale: it also uses only one channel like bitmap, but it has intensity levels from 0 to 255. You can use it if you want to print your image on a noncolor printer.
- RGB color: this is what you will use if you want to make images for the web. This color mode is used by computer monitors and the human eye. It’s divided into 3 color channels (red, green, and blue) and each channel has intensity levels that range between 0 and 255.
- CMYK color: is used for printing and it’s made up of 4 channels: cyan, magenta, yellow, and black.
- Lab color: it has two channels dedicated to color and one to intensity.
- Background Contents:you can choose between a white background, a transparent one, or you can choose a different color for it.
The work space layout
This is the area you need to get yourself accustomed to. You can add new windows to your work space from Widow.- Canvas: is the main work space where you will create and modify images.
- History: you can access the History panel from Window. It allows you to see the actions you have taken and you can even go back up to a previous point in your work.
- Layers: each layer on your canvas is an individual level and work done on a layer is independent of the other layers. Since layers are one of the most difficult concepts to understand, the next lesson will focus on them.
- Tools: the toolbar is full of useful tools, but it takes some time to learn all of them. Some of the most important are:the marquee tools: allow you to make selections
- the brush tool: can be used to write or draw
- eraser tool: deletes a certain color or the whole layer
- eyedropper tool: allows you to select the color from an image
- paint bucket and gradient tool: will fill the whole layer or a selected area with color or gradient
- pen tool: you can make shapes or selections
- text tool: adds text to images
- shape tools: allows you to draw different shapes


Very useful and Very interesting article. Thank you.
ReplyDeleteBackground removal service| Multiple Clipping Path| Images Background Remover
Such a really helpful article. terribly fascinating to scan this text. I would wish to thank you for the efforts you had created for putting this on ink awe-inspiring article. Read more: Clipping path service.
ReplyDelete