Although I continually suggest setting your white balance privately (and here’s my favorite thanks to do it!) it’s comparatively straightforward to correct your white balance in process, in either Photoshop / components and Lightroom. If you have got a neutral tone in your image, then you’ll virtually fix it during a matter of minutes (if you do not, it is a bit a lot of difficult, however still do-able!))
Checking and fixing your white balance ought to be the primary factor you are doing in writing to a picture, thus here’s a way to do it!
Step One: Grab Your White Balance Tool

Step Two: Check Your Neutral

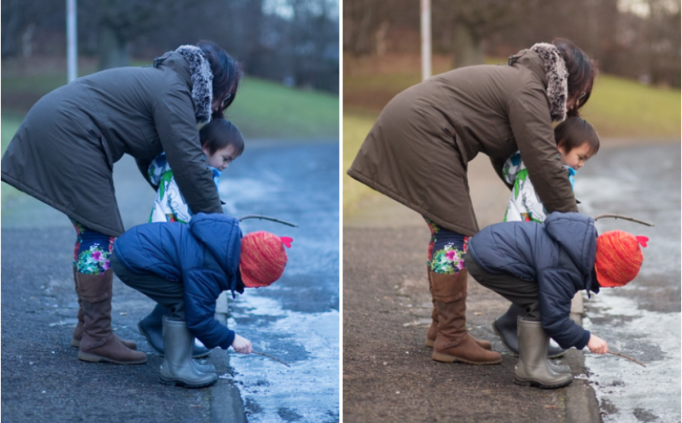
You can probably tell just by looking at it that it is too cool (all that blue!) so we need to check and change the white balance on this one for sure!
However, if you weren’t so sure whether the white balance is correct, you can check it – by hovering your white balance tool over a neutral area.
In this particular image, there are a number of neutrals we can use (neutrals being anything white, black or grey) and having a neutral like this in your image makes setting the correct white balance much easier. In this case, we could use the sidewalk / pavement or even the grey boots to set our white balance.
All you need to do is take the white balance tool and hover over your known neutral. If the RGB numbers aren’t all almost equal (it doesn’t matter what the numbers are, just that they are all the same or nearly the same) then your white balance is off!
Step Three – Click on The Neutral Area
Changing your WB super easy, simply click with your dropper on your chosen neutral area – in this case I’m clicking on the concrete on the sidewalk – and your image will change to the correct white balance by making the RGB numbers of that area the same. (told you it was easy!)As you click around the neutral area you will find that your will get a slightly different color to your image. All you need to do is choose a white balance that is most pleasing to you, or what looks the most like the scene really did. Get it as close as you can at this stage.
Step Four – Fine Tune with The Sliders

If you’re thinking that it’s still too cool / blue move the temperature slider to the correct toward yellow, too heat and you progress it move it towards blue. you would possibly conjointly ought to modify your tint sliders – once more if the image is wanting too pink overall then move it toward inexperienced, and if it’s too inexperienced slide it over by some notches toward the magenta slide. If you’re unsure, move the sliders separately – you’ll begin to examine a distinction and see if it’s higher or worse than before!
Help! There Isn’t A Neutral (or it gives you a wonky looking image)

Assuming you shot in RAW (and if you don’t this can be a reasonably smart reason to try and do so!) you may have an inventory of white balance choices from the drop menu right the correct. merely select the white balance that was nighest to the conditions you shot in. For this explicit image, the day was terribly overcast, therefore i might select Cloudy or Shade from the change posture menu.
From there, again, you will probably need to move your sliders to get the right white balance.
If you are a JPEG shooter you won’t have these drop down options, your only option is to move the temperature and tint sliders to get it right (and make a note to find out how to make the switch to RAW)
Here’s the same image with the white balance corrected.


ReplyDeleteSome blogs like this are surely be very much important for many of the peoples who are seeking such kind of information.Like this so much.
clipping path service
Background Removal Service